This section provides examples of the most popular rules and scripts. With their help, you can use real examples to understand the principles of automation and configure automation in your video surveillance system. Each example is accompanied by a description, as well as examples describing the possibilities of applying a rule/script.
Sending email upon loss of a camera's signal
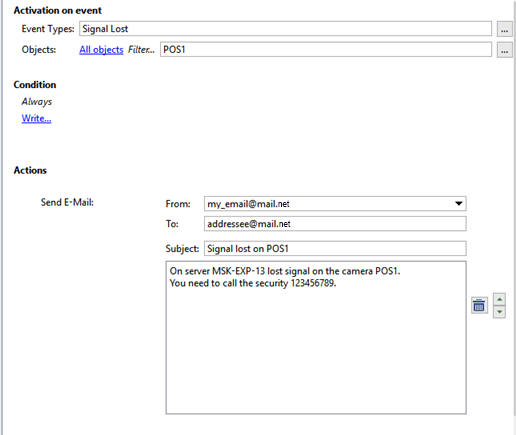
This example considers a rule designed to quickly report server problems, in particular the lack of a signal from one of a system's high priority cameras: When the signal from the selected camera as lost, and email notification of the event will be sent.
- Beforehand, you should create an e-mail account. After that, Create a new rule and choose On Event activation. Find the Channel in the opened window and check the Signal Lost box.
- After that select the events of objects, on which the rule will be activated. To do this, click Filter and select the required camera in the object list. In this case, this camera is called "Warehouse".
-
Then click Send email - the email template window will open. You'll get the following message as a result:
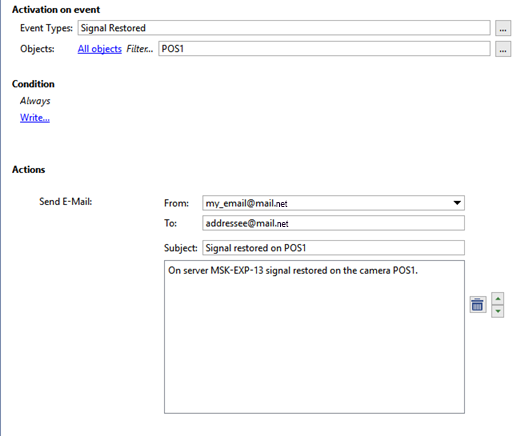
The following image depicts an example of a rule with the opposite behavior: in this case, if the "Warehouse" camera's signal is restored, an email will be sent reporting that the camera's signal has been restored.
Below is an example of a script with extended functionality: An email will be sent when any camera's signal is lost, and the email will indicate the name of the corresponding channel:
def send_message(event):
	message_text = '''The server [server name] has lost the signal to camera "%s".\
	Call security at 123456789.'''\
	% event.origin_object.name
	send_mail_from_account("sender@mail.net", ["addressee@mail.net"],\
	"Email subject: No signal from camera '%s'" % event.origin_object.name,\
	message_text, [])

activate_on_events("Signal Lost", "", send_message)
Displaying a camera in fullscreen mode when motion is detected
In this example we consider a rule designed to attract the operator's attention to those cameras for which the very presence of motion is an alarm event: when motion occurs on the specified camera, it will expand to fullscreen on the selected monitor.
- You must first enable generation of motion events on the desired camera. To do this, go to the Channels section of the server settings, select the desired channel and place a checkmark in the Generate motion events checkbox. Motion events will then begin to be recorded in the event log for the given channel.
- Next create a new rule and select the On event activation type. In the window that opens, find the Channel section and put a checkmark in the Motion detected checkbox.
- Then you must determine the objects whose events the rule will respond to. To do this, click the Filter link in the rule window and select the desired camera. In our example, this camera is named "Cold store".
- Next click the Invoke action link. In the window that appears, select the Operator [server name]'s interface section on the left and the show_channel line on the right. You will then be able to specify the channel and monitor in the rule.

Below is an example of a script with extended functionality: any camera where motion occurs will go fullscreen on a second monitor. To do this, set the Generate motion events checkbox in the settings for the desired channels. Then create a new script and insert the following code:
def show_channel_with_motion(event):
	object("Operator [server name]'s interface").\
	show_channel(event.origin,2)

activate_on_events("Motion Start", "", show_channel_with_motion)
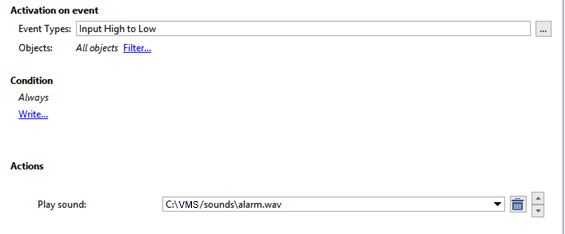
Play a sound when an alarm input is tripped
In this example we consider a rule designed to attract the operator's attention to an alarm situation by playing an audio file. According to the example, when an alarm input is tripped, an audio notification will play. You can use an alarm input to monitor, for example, a door, window, or various sensors.
- Create a new rule and select the On event activation type. In the window that opens, find the GPIO input section and put a checkmark in the Signal on input loss checkbox.
- Then click the Filter link and, in the object list, select the alarm input that interests you. In our example, this object is named "West exit (door)".
- Then click the Play sound link and, in the dropdown list, select one of the preinstalled sounds.
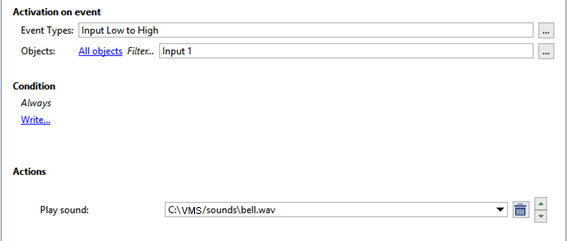
Below is an example of a rule with opposite activation: in this case, if the alarm input is closed, then an audio file will be played to notify the operator that the door of the west exit has been closed.
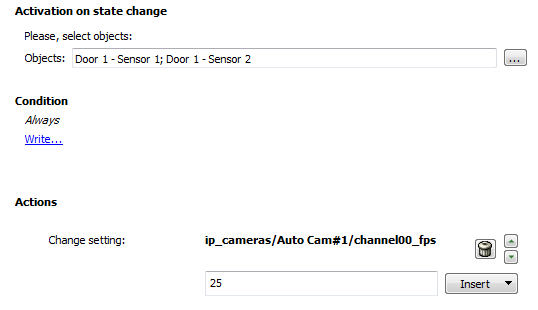
Increasing the FPS on a camera when the state of an Orion device changes
In this example we consider a rule designed to increase the detail of a video sequence when an alarm situation occurs, for the purpose of a subsequent in-depth analysis. According to the rule, when the state of an Orion workstation device changes, the FPS of one of the cameras will increase.
- Create a new rule and select the On state change activation type. In the window that opens, find the Orion and put a checkmark in the checkbox for the desired device.
- Then click the Change settings link. In the Insert settings window, expand the IP devices section and select the desired IP device. Select the channel00_fps string. The select the desired number of frames per second in the window that appears.
Below is an example of a script with extended functionality. According to the example, when the state of an Orion workstation device changes, the FPS will increase for all cameras.
  def set_fps_on_all_devices(fps):
	for d in settings("ip_cameras").ls():
		if d.type != "Grabber": continue
		for c in range(0, 16):
			d["channel%02d_fps" % c] = fps
	for b in settings("boards").ls():
		for i in range(0, 16):
			b["channel%02d_fps" % i] = fps

def condition():
	if object_sh1p127.state("state") == "Alarm"
		set_fps_on_all_devices(25)
	elif object_sh1p127.state("state") == "Armed"
		set_fps_on_all_devices(12)

object_sh1p127 = object("Alarm Circuit 1, Device 127")
object_sh1p127.activate_on_state_changes(condition)
Send an email when a server's health metric changes
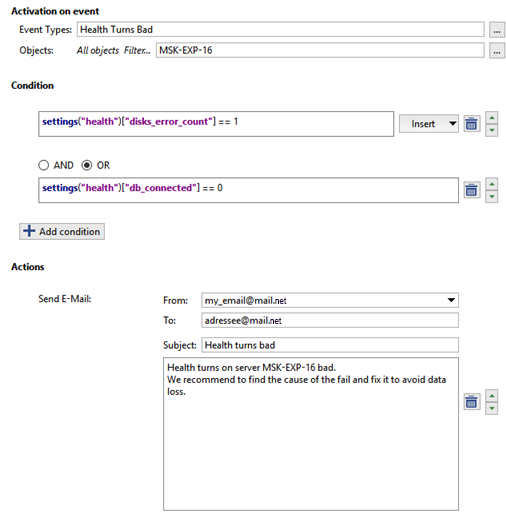
This example considers a rule which says that when the database is disconnected and/or there are disk errors on the server, an email notification will be sent.
- First it is necessary to create an email account. Next add new rule and select By event activation type, find Server in the appeared window and check the box Server health turns bad.
- As a next step press Filter and check the box of the required server in Object window.
-
To ensure that the letters are sent only in case data base disconnection and/or under disk errors, the appropriate conditions shall be provided:
- Find the Health section and select the disks_error_count string. Then specify a value for the disk_error_count parameter by entering " == 1" in the text field, without quotation marks.
- Find the Health section and select the db_connected string. Then specify a value for the db_connected parameter by entering " == 0" in the text field, without quotation marks.
Select the conjunction or between each condition.
-
After that press Send email and the form to create letter template will appear. In the result you shall have the rule of approximately as follows:
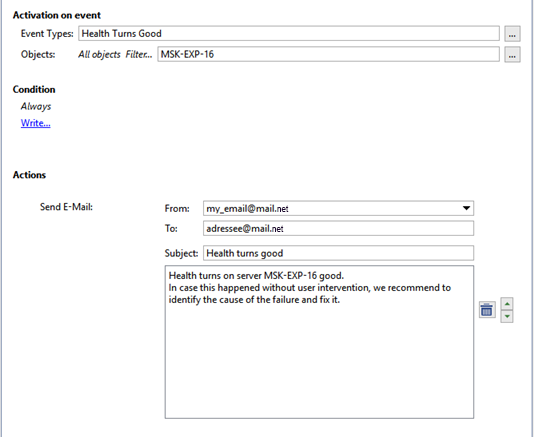
Below is a rule that says that when the server's state changes to normal, and email notification reporting this fact will be sent.
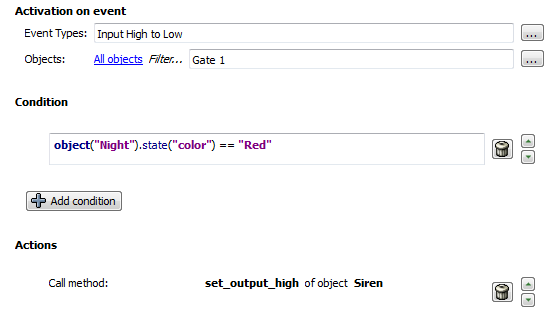
Enable sirens when an alarm input is tripped at night
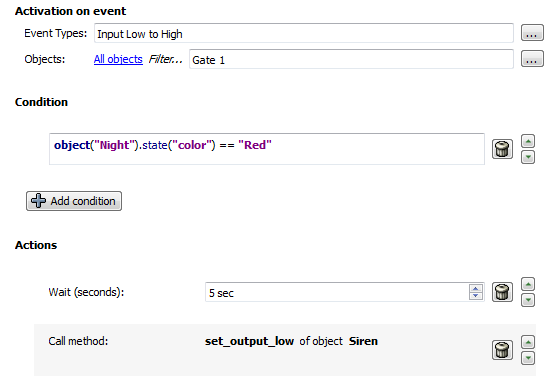
In this example we consider a rule designed to set off an alarm if there is a break-in at a site at night. This example uses a schedule, and alarm input on the door of the west exit, and alarm output connected to a siren. Thus, if the door of the west exit is opened at night, the siren will be enabled.
-
A Schedule needs to be created beforehand.

- Next create a new rule and select On event, activation type. In the window which will appear find GPIO input and check Input signal lost box.
- Then click on Filter and in theObject window check alarm input box, in our case it is "Emergency exit(door)".
- Further on we need to connect this rule with the schedule in such a way as to ensure its operation in night time only. To do this in the Condition select Objects state line, define timetable created earlier, click color and select red.
-
After that, click Action in the window of the rule, in the window Object select emergency exit to which audible horn is connected and set_output_high line. In the result the rule shall look like as follows:
Below is an example of a rule with opposite activation: if the door of the west exit is closed (the alarm input is closed), then the siren will be shut off after five seconds (the alarm output will be opened).
Creating and displaying user messages in Access Control log
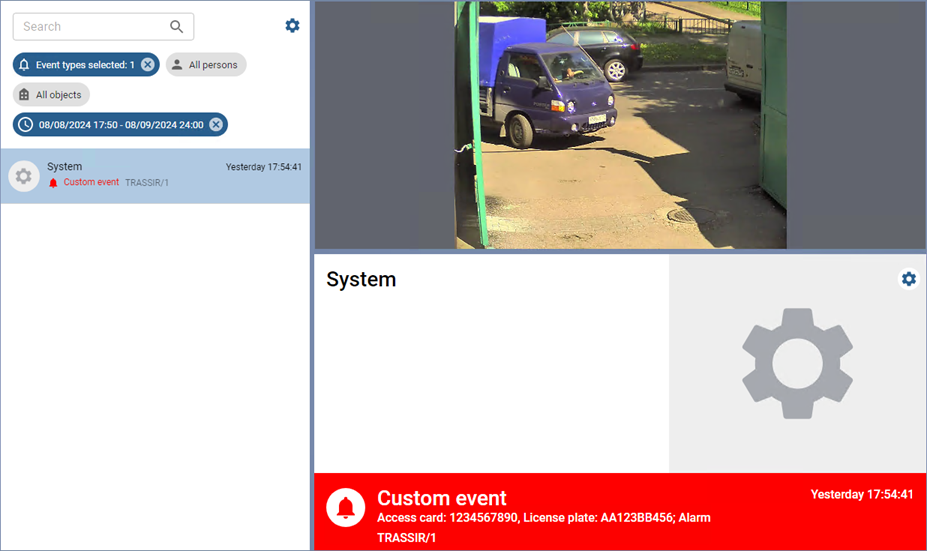
In this example, we will consider a rule that creates a custom event and displays it in the TRASSIR ACS log
-
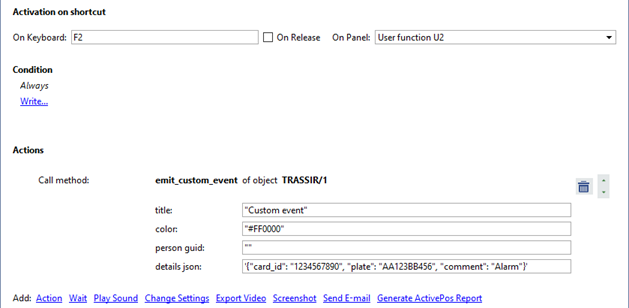
Create a new rule and select Activation on shortcut activation type. Press the key that will execute the rule In the window that opens, in the On keyboard field.
-
Next, press Action, in the window that opens select Access Control section and the Access point. In the right window, select emit_custom_event(string_title, string_color, string_person_guid, string_details_json) string. Press ОК. After that, it will be possible to specify the custom event parameters in the rule.
-
Specify the following parameters for the custom event:
-
Enter the title of the custom event into the title field.
-
In the color field, enter the color of the event (in HEX format). All TRASSIR ACS events created by this rule will be colored with it.
-
Enter the GUID of the TRASSIR ACS person, on whose behalf the custom events will be displayed, into the person guid field.
The process for obtaining the server object's GUID is described in the TRASSIR SDK in section Working with objects.
To display the event on behalf of the system, type “” (empty quotes).
-
In the details json field, enter the event parameters (in JSON format, in single quotes) that will be displayed in the custom event as additional information. You can use the person properties as parameters:
For example,
'{"card_id": "1234567890", "plate": "AA123BB456", "comment": "Alarm"}'Where,
card_id - card number;
plate - license plate number;
comment - optional comment.
Tip
If the TRASSIR ACS person's GUID is entered in the person guid field, then the card_id and the plate properties must contain the person's card number and the license plate number as entered in this person's parameters.
If the person guid field is empty, any values can be specified.
-
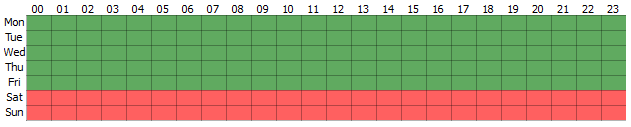
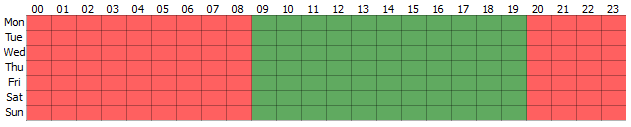
Changing FPS for all channels at night
In this example, we consider a script designed to change the FPS for all channels according to a schedule: when night falls, the frame rate for all channels will be changed to 12 fps; when morning comes, it will be changed to 25 fps.
First, you must create a schedule. The screenshot below shows a schedule for this example.

Then create a new script and copy the following code to it.
def set_fps_on_all_devices(fps):
	for d in settings("ip_cameras").ls():
		if d.type != "Grabber": continue
		for c in range(16):
			d["channel%02d_fps" % c] = fps
	for b in settings("boards").ls():
		for i in range(16):
			b["channel%02d_fps" % i] = fps

def condition():
	if (object_schedule.state("color") == "Red") :
		set_fps_on_all_devices(12)
	elif (object_schedule.state("color") == "Green") :
		set_fps_on_all_devices(25)

object_schedule = object("Night")
object_schedule.activate_on_state_changes(condition)
Let's examine a few parts in more detail.
-
In this part of the script the activator is specified,and the schedule serves are activators. It is sufficient to changethe schedule name to connect the script to any other schedule
object("Night").object_schedule = object("Night") object_schedule.activate_on_state_changes(condition) -
The 'condition' function defines a condition whereby if the schedule is in the red zone, the variable "fps" is assigned the value "12"; but if it is in the green zone, the variable is assigned the value "25.
def condition(): if (object_schedule.state("color") == "Red") : set_fps_on_all_devices(12) elif (object_schedule.state("color") == "Green") : set_fps_on_all_devices(25) -
In this part of the script, the frame rate of all channels for all devices is set equal to the value of the variable "fps".
def set_fps_on_all_devices(fps):
	for d in settings("ip_cameras").ls():
		if d.type != "Grabber": continue
		for c in range(16):
			d["channel%02d_fps" % c] = fps
	for b in settings("boards").ls():
		for i in range(16):
	b["channel%02d_fps" % i] = fps
Below is a simplified version of the script in which the hotkeys F5 and F6 are the activator.
def set_fps_on_all_devices(fps):
	for d in settings("ip_cameras").ls():
		if d.type != "Grabber": continue
		for c in range(16):
			d["channel%02d_fps" % c] = fps
	for b in settings("boards").ls():
		for i in range(16):
			b["channel%02d_fps" % i] = fps

def channel_fps_25():
	set_fps_on_all_devices(25)

def channel_fps_12():
	set_fps_on_all_devices(12)

activate_on_shortcut("F5", channel_fps_25)
activate_on_shortcut("F6", channel_fps_12)
Enabling economy mode on weekends for all devices in the Lanser family
In this example, we consider a script that will cause all devices in the Lanser family to operate in normal mode on weekdays and in the economy mode on weekends.
First, you must create a schedule. The screenshot below shows a schedule for this example.
Then create a new script and copy the following code to it.
def economy_mode_on_all_nvr(on):
	for d in settings("ip_cameras").ls():
		if d.type != "Grabber": continue
		if d["family"] == "NVR":
			d["economy_mode"] = on

def condition():
	if (object_schedule.state("color") == "Red") :
		economy_mode_on_all_nvr(1)
	elif (object_schedule.state("color") == "Green") :
		economy_mode_on_all_nvr(0)

object_schedule = object("Weekends")
object_schedule.activate_on_state_changes(condition)
Let's examine a few parts in more detail.
-
In this part of the script the activator is specified,and the schedule is an activator. It is sufficient to changethe schedule name to connect the script to any other schedule
object("Weekend")object_schedule = object("Weekend") object_schedule.activate_on_state_changes(condition) -
The 'condition' function defines a condition whereby if the schedule is in the red zone, the variable "on" is assigned the value 1; but if it is in the green zone, the variable is assigned the value 0.
def condition(): if (object_schedule.state("color") == "Red") : economy_mode_on_all_nvr(1) elif (object_schedule.state("color") == "Green") : economy_mode_on_all_nvr(0) -
In this part of the script, the parameter "economy_mode" is assigned the value of the variable "on" for all devices in the Lanser family.
def economy_mode_on_all_nvr(on):
	for d in settings("ip_cameras").ls():
		if d.type != "Grabber": continue
		if d["family"] == "NVR":
			d["economy_mode"] = on
Below is an example of a simplified script that will switch Lanser devices in and out of economy mode using the hotkeys F5 and F6, respectively.
def economy_mode_on_all_nvr(on):
	for d in settings("ip_cameras").ls():
		if d.type != "Grabber": continue
		if d["family"] == "NVR":
			d["economy_mode"] = on

def economy_mode_on():
	economy_mode_on_all_nvr(1)

def economy_mode_off():
	economy_mode_on_all_nvr(0)

activate_on_shortcut("F5", economy_mode_on)
activate_on_shortcut("F6", economy_mode_off)
Locking an alarm output when a car on a AutoTRASSIR whitelist passes
In this example, we're going to review a script designed to automatically control the swing barrier. When a machine on a whitelist drives by, the swing barrier will open. The implementation uses AutoTRASSIR's whitelist functionality and an alarm output.
It is necessary to configure internal license plate number lists or connect external list beforehand. After that you should create a new script and copy and paste the following code.
lock = False

class TaskLocker:
	def __init__(self):
		global lock
		if lock:
			self.have_lock = False
			return
		else:
			self.have_lock = True
			lock = True
			gates_open(self)

	def __del__(self):
		if self.have_lock:
			global lock
			lock = not 1

def gates_close(lock):
	object("Output 1").set_output_low()

def waiting(lock):
	timeout(10 * 1000, lambda: gates_close(lock))

def gates_open(lock):
	object("Output 1").set_output_high()
	waiting(lock)

def acquire_lock():
	TaskLocker()

def the_lpr_handler(event):
	if event.flags & LPR_WHITELIST:
		acquire_lock()

activate_on_lpr_events(the_lpr_handler)
Let's examine a few blocks in more detail.
-
This part of the script indicates the activator; in this case, the activator is an event from AutoTRASSIR.
activate_on_lpr_events(the_lpr_handler)
-
The function the_lpr_handler(event) checks to see if the number is on the whitelist. If the recognized license plate numbers on the white list, then the acquire_lock() function is run.
def the_lpr_handler(event): if event.flags & LPR_WHITELIST: aquire_lock() message("Vehicle on white list") -
The acquire_lock() function calls the TaskLocker() class.
def aquire_lock():
	TaskLocker()
-
The TaskLocker class is designed to allow the script to run to completion. If the actions in the script take a long time to complete and the script is invoked before the previous instance of itself finishes executing, the TaskLocker class prevents the script from being run again until the original instance of the script has run to completion.
lock = False

class TaskLocker:
	def __init__(self):
		global lock
		if lock:
			self.have_lock = False
			return
		else:
			self.have_lock = True
			lock = True
			gates_open(self)

	def __del__(self):
		if self.have_lock:
			global lock
	lock = not 1
-
The function gates_open(lock) locks alarm output "Output 1" and calls waiting(lock).
def gates_open(lock): object("Output 1").set_output_high() waiting(lock) -
The function waiting(lock) waits for 10 seconds and then calls gates_close(lock).
def waiting(lock):
	timeout(10 * 1000, lambda: gates_close(lock))
-
The function gates_close(lock) unlocks alarm output "Output 1".
def gates_close(lock):
	object("Output 1").set_output_low()
Below is the script that will plan audiophile when a license plate number on the blacklist is recognized.
def play_sound(filename):
	import platform
	if platform.system() == 'Windows':
		import winsound
		winsound.PlaySound(filename, winsound.SND_FILENAME\
		| winsound.SND_ASYNC | winsound.SND_NOWAIT)
	else:
		alert('Not implemented')

def the_lpr_handler(event):
	if event.flags & LPR_BLACKLIST:
		play_sound(r"C:\VMS\sounds\alarm.wav")

activate_on_lpr_events(the_lpr_handler)
Saving AutoTRASSIR screenshots to different folders
In this example we consider a script designed to save screenshots of vehicles from the whitelist and blacklist, or whose license plate numbers were poorly recognized, to different folders. The implementation uses AutoTRASSIR lists and the screenshot saving functionality.
You should configure internal license plate number lists or connect external list beforehand. After that create a new script and copy and paste the following code.
def condition(event):
    if event.quality == 0 :
        obj(event.channel).screenshot_ex("", r"C:\VMS\Screenshots\Low_quality")
    elif event.flags & LPR_WHITELIST :
        obj(event.channel).screenshot_ex("", r"C:\VMS\Screenshots\Whitelist")
    elif event.flags & LPR_BLACKLIST :
        obj(event.channel).screenshot_ex("", r"C:\VMS\Screenshots\Blacklist")

activate_on_lpr_events(condition)
Let's examine a few parts in more detail.
-
This part of the script indicates the activator; in this case, the activator is an event from AutoTRASSIR.
activate_on_lpr_events(condition)
-
The function 'condition' defines a condition whereby:
- if the recognition confidence of any one symbol on the license plate is zero, a screenshot will be captured and placed in
the "C:\VMS\Screenshots\Low_quality" folder
if event.quality == 0 : obj(event.channel).screenshot_ex\ ("",r"C:\VMS\Screenshots\Low_quality") - If the recognized number is on the whitelist, a screenshot will be captured and placed in the "C:\VMS\Screenshots\Whitelist"
folder
elif event.flags & LPR_WHITELIST : obj(event.channel).screenshot_ex\ ("",r"C:\VMS\Screenshots\Whitelist") - If the recognized number is on the blacklist, a screenshot will be captured and placed in the "C:\VMS\Screenshots\Blacklist"
folder
elif event.flags & LPR_BLACKLIST :
    obj(event.channel).screenshot_ex\
    ("",r"C:\VMS\Screenshots\Blacklist")
- if the recognition confidence of any one symbol on the license plate is zero, a screenshot will be captured and placed in
the "C:\VMS\Screenshots\Low_quality" folder
Screenshot when a cashier signs in
In this example, we consider a script that will be activated based on an event from the ActivePOS point-of-sale operations control system. The specified event is a cashier signing in, and the action is to save a screenshot from the associated channel. Thus, when a cashier signs into a cash register, a screenshot with the cashier will be saved; this makes it possible to verify the identity of the cashier, if necessary.
def shot(event):
    if event.type == "POS_CASHIER_REGISTRATION":
        obj(event.associated_channel).screenshot_ex("",r"C:\VMS\Screenshots\Cashiers")

activate_on_pos_events(shot)
-
This part of the script indicates the activator; in this case, the activator is an event from ActivePOS.
activate_on_pos_events(shot)
-
The function shot(event) defines a condition whereby if the event is a cashier signing in, then a screenshot from the associated channel is saved to "C:\VMS\Screenshots\Cashiers".
def shot(event):
	if event.type == "POS_CASHIER_REGISTRATION":
		obj(event.associated_channel).screenshot_ex\
		("",r"C:\VMS\Screenshots\Cashiers")
Placing a warning flag on a receipt when alcohol is sold at night
Each store has certain scenarios of events that are alarming and require verification. ActivePOS allows you to mark such events with alarm bookmarks and add arbitrary comments. After that, you can sample these events for further analysis. In this example, we will consider a script that marks the sale of alcohol at night as an alarm event.
First, you must create a schedule. The screenshot below shows a schedule for this example.
Then create a new script and insert the following code:
def condition(ev):
	if (object("Night").state("color") == "Red"): return
	if ev.type!="POS_POSITION_ADD": return
	u = ev.text.decode("utf-8").upper().encode("utf-8")
	for w in ["BEER", "WINE", "VODKA", "COGNAC"]:
		if u.find(w) != -1:
			pos_fraud(ev, "Warning! Unlawful sale of alcohol!")
			return

activate_on_pos_events(condition)
Let's examine a few parts in more detail.
-
This part of the script indicates the activator; in this case, the activator is an event from ActivePOS.
activate_on_pos_events(condition)
-
The condition function checks if the "Night" schedule is in the red area and if the event is item adding. In case the result is positive, search for the following words in the goods name is done: "BEER", "WINE", "VODKA", "BRANDY"(the other names which are used for the goods being sold in your store can be added). In case one of these words are found in the name of the goods, troubling tab will be inserted into the receipt using pos_fraud method, and troubling event will be accompanied with pre-set comment.
def condition(ev):
	if (object("Night").state("color") == "Red"): return
	if ev.type!="POS_POSITION_ADD": return

	u = ev.text.decode("utf-8").upper().encode("utf-8")
	for w in ["BEER", "WINE", "VODKA", "BRANDY"]:
		if u.find(w) != -1:
			pos_fraud(ev, "Attention! Illegal sale of alcohol!")
			return
Export archive when a receipt is canceled
In this example, we consider a script that will export the archive from the camera over a cash register when a receipt or position is canceled; the recording will go into an electronic file that will include 15 seconds before the event and 15 seconds after it.
To begin, create a new script and copy the following code to it.
from time import strftime
from time import time
from time import localtime
from os import path

def export_wait(filename, callback):
    status = get_archive_export_status(path.basename(filename))
    if status==1:
        timeout(1000, lambda: export_wait(filename, callback))
    elif status==0 or status==2:
        alert("AVI export failed")
        callback()
    else:
        if not path.exists(decode(filename)):
            alert("Exported file %s not found!" % filename)
        callback()

def action0_2():
    pass

def start_export(ev, t1, t2, filename):
    object("Operator m-gilyazov's interface").archive_export\
    (ev.associated_channel, t1, t2, path.basename(filename), 0)
    timeout(1000, lambda: export_wait(filename, lambda: action0_2()))

def condition(event):
    if event.type == "POS_RECEIPT_CANCEL"\
    or event.type == "POS_POSITION_CANCEL":
        t = time()
        t1 = '%.0f' % ((t-30)*1000000)
        t2 = '%.0f' % (t*1000000)
        shots_path = r"C:\VMS\Screenshots\cancel"
        filename = event.pos_terminal_name + strftime('%Y%m%d_%H%M%S',\
        localtime(t)) + '.avi'
        filename = shots_path + '/' + filename
        timeout(15000, lambda: start_export(event, t1, t2, filename))

activate_on_pos_events(condition)
Let's examine a few parts in more detail.
-
This part of the script indicates the activator; in this case, the activator is an event from ActivePOS.
activate_on_pos_events(condition)
-
The 'condition' function determines if the event is a canceled position or canceled receipt. If it is, the start_export function is executed. The 'condition' function also specifies a 30-second wait, and output filename, and the path to the folder where the electronic file will be saved.
def condition(event): if event.type == "POS_RECEIPT_CANCEL"\ or event.type == "POS_POSITION_CANCEL": t = time() t1 = '%.0f' % ((t-30)*1000000) t2 = '%.0f' % (t*1000000) shots_path = r"C:\VMS\Screenshots\cancel" filename = event.pos_terminal_name +\ strftime('%Y%m%d_%H%M%S', localtime(t)) + '.avi' filename = shots_path + '/' + filename exported_files[event.pos_terminal_name] = filename timeout(15000, lambda: start_export\ (event, t1, t2, filename)) -
The start_export function starts exporting the archive with the previously specified settings and invokes the export_wait function.
def start_export(ev, t1, t2, filename): object("Operator's interface m-gilyazov").archive_export\ (ev.associated_channel, t1, t2, path.basename(filename), 0) timeout(1000, lambda: export_wait(filename, lambda: action0_2())) -
The 'export_wait' function determines if an archive export is currently underway from a previous instance of the script; if it is not, then action0_2 is executed.
def start_export(ev, t1, t2, filename):
    object("Operator's interface m-gilyazov").archive_export\
    (ev.associated_channel, t1, t2, path.basename(filename), 0)
    timeout(1000, lambda: export_wait(filename, lambda: action0_2()))
Changing the sensitivity of a detector according to a schedule
In this example, we consider a script designed to change the sensitivity of a motion detector according to a schedule. It can reduce the number of false positives due to noise at night.
First, you must create a schedule. The screenshot below shows a schedule for this example.
Then create a new script and copy the following code to it.
night = \
'''22 18
zone_mask Zone 1
2 0 0
1111111111111111111111
1111111111111111111111
1111111111111111111111
1111111111111111111111
1111111111111111111111
1111111111111111111111
1111111111111111111111
1111111111111111111111
1111111111111111111111
1111111111111111111111
1111111111111111111111
1111111111111111111111
1111111111111111111111
1111111111111111111111
1111111111111111111111
1111111111111111111111
1111111111111111111111
1111111111111111111111'''

day = \
'''22 18
zone_mask Zone 1
5 0 0
1111111111111111111111
1111111111111111111111
1111111111111111111111
1111111111111111111111
1111111111111111111111
1111111111111111111111
1111111111111111111111
1111111111111111111111
1111111111111111111111
1111111111111111111111
1111111111111111111111
1111111111111111111111
1111111111111111111111
1111111111111111111111
1111111111111111111111
1111111111111111111111
1111111111111111111111
1111111111111111111111'''

def md_settings(md):
	for d in settings("ip_cameras").ls():
		if d.type != "Grabber": continue
		if d["family"] == "Hikvision":
			d["channel00_md_setup"] = md

def condition():
	if (object_schedule.state("color") == "Red") :
		md_settings(night)
	elif (object_schedule.state("color") == "Green") :
		md_settings(day)

object_schedule = object("From Dusk Till Dawn")
object_schedule.activate_on_state_changes(condition)
Let's examine a few parts in more detail.
-
In this part of the script the activator is specified, and the schedule is an activator. It is sufficient to change the schedule name to connect the script to any other schedule
object("From Dusk Till Dawn")object_schedule = object("From Dusk Till Dawn") object_schedule.activate_on_state_changes(condition) -
The 'condition' function defines a condition whereby if the schedule is in the red zone, the variable "md" is assigned the value "night"; but if it is in the green zone, the variable is assigned the value "day".
def condition(): if (object_schedule.state("color") == "Red") : md_settings(night) elif (object_schedule.state("color") == "Green") : md_settings(day) -
In this part of the script, the variable "channel00_md_setup" is set equal to the value of the parameter "md" for all devices in the "Hikvision" family.
def md_settings(md): for d in settings("ip_cameras").ls(): if d.type != "Grabber": continue if d["family"] == "Hikvision": d["channel00_md_setup"] = md -
The "day" and "night" variables define the zone settings and sensitivity of the hardware-based detector.
Below is an example of a script that changes the sensitivity of a software-based detector for all channels, according to a schedule.
night = \
'''32 32
zone_mask Zone 1
5 0 0
11111111111111111111111111111111
11111111111111111111111111111111
11111111111111111111111111111111
11111111111111111111111111111111
11111111111111111111111111111111
11111111111111111111111111111111
11111111111111111111111111111111
11111111111111111111111111111111
11111111111111111111111111111111
11111111111111111111111111111111
11111111111111111111111111111111
11111111111111111111111111111111
11111111111111111111111111111111
11111111111111111111111111111111
11111111111111111111111111111111
11111111111111111111111111111111
11111111111111111111111111111111
11111111111111111111111111111111
11111111111111111111111111111111
11111111111111111111111111111111
11111111111111111111111111111111
11111111111111111111111111111111
11111111111111111111111111111111
11111111111111111111111111111111
11111111111111111111111111111111
11111111111111111111111111111111
11111111111111111111111111111111
11111111111111111111111111111111
11111111111111111111111111111111
11111111111111111111111111111111
11111111111111111111111111111111
11111111111111111111111111111111
'''

day = \
'''32 32
zone_mask Zone 1
10 0 0
11111111111111111111111111111111
11111111111111111111111111111111
11111111111111111111111111111111
11111111111111111111111111111111
11111111111111111111111111111111
11111111111111111111111111111111
11111111111111111111111111111111
11111111111111111111111111111111
11111111111111111111111111111111
11111111111111111111111111111111
11111111111111111111111111111111
11111111111111111111111111111111
11111111111111111111111111111111
11111111111111111111111111111111
11111111111111111111111111111111
11111111111111111111111111111111
11111111111111111111111111111111
11111111111111111111111111111111
11111111111111111111111111111111
11111111111111111111111111111111
11111111111111111111111111111111
11111111111111111111111111111111
11111111111111111111111111111111
11111111111111111111111111111111
11111111111111111111111111111111
11111111111111111111111111111111
11111111111111111111111111111111
11111111111111111111111111111111
11111111111111111111111111111111
11111111111111111111111111111111
11111111111111111111111111111111
11111111111111111111111111111111
'''

def md_settings(md):
	for d in settings("channels").ls():
		if d["archive_zombie_flag"] == 0:
			d["software_md_setup"] = md

def condition():
	if (object_schedule.state("color") == "Red") :
		md_settings(night)
	elif (object_schedule.state("color") == "Green") :
		md_settings(day)

object_schedule = object("From_Dusk_Till_Dawn")
object_schedule.activate_on_state_changes(condition)
Changing a server's state during an extended period of high processor load
In this example, we consider a script designed to change the server's state to an alarm state during an extended period of high processor load.
To begin, create a new script and copy the following code to it.
from collections import deque

a = deque()
i = 0
l = 15 #length of queue a
t = 30000 #sample frequency in ms
k = 85 #critical processor load

def iter_func():
	global a, i, l, t, k

	if len(a) >= l:
		a.popleft()
	i = settings("health")["cpu_usage"]
	a.append(i)

	s = 0
	c = 0
	for j in xrange(0, len(a)):
		s += a[j]

	c = s / l
	if c >= k :
		settings("health")["user_defined_health_indicator"] = 0
	else :
		settings("health")["user_defined_health_indicator"] = -1
	timeout(t, iter_func)


def start_script():
	iter_func()


start_script()
Let's examine a few parts in more detail.
-
In this part of the script, the length of queue a is checked and the latest processor load value is written to it.
if len(a) >= l: a.popleft() a.append(i) i = settings("health")["cpu_usage"] -
In the next part of the script, all of the elements of double-ended queue a are added together.
 s = 0
	c = 0
	for j in xrange(0, len(a)):
		s += a[j]
-
In this part of the script, the average processor load c is computed and compared with critical value k. If the average value is greater than or equal to the critical value, the server's state is manually downgraded. If the average value is less than the critical value, the server's state is switch to normal.
 c = s / l
	if c >= k :
		settings("health")["user_defined_health_indicator"] = 0
	else :
		settings("health")["user_defined_health_indicator"] = -1
	timeout(t, iter_func)
