Face detector automatically detects the appearance or disappearance of faces within a specified virtual zone in the field of view of the video camera. It is used to protect territories, control access and increase the level of security.
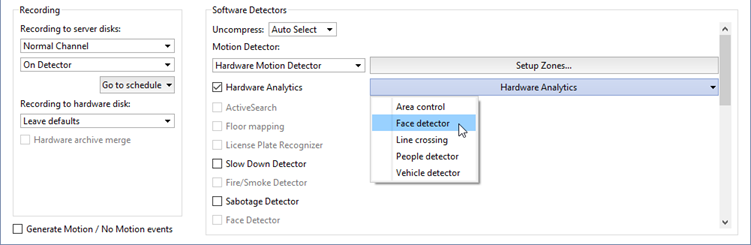
To enable and configure the Face detector, you need to check Hardware Analytics in Channel Settings, click the button and select Face detector.
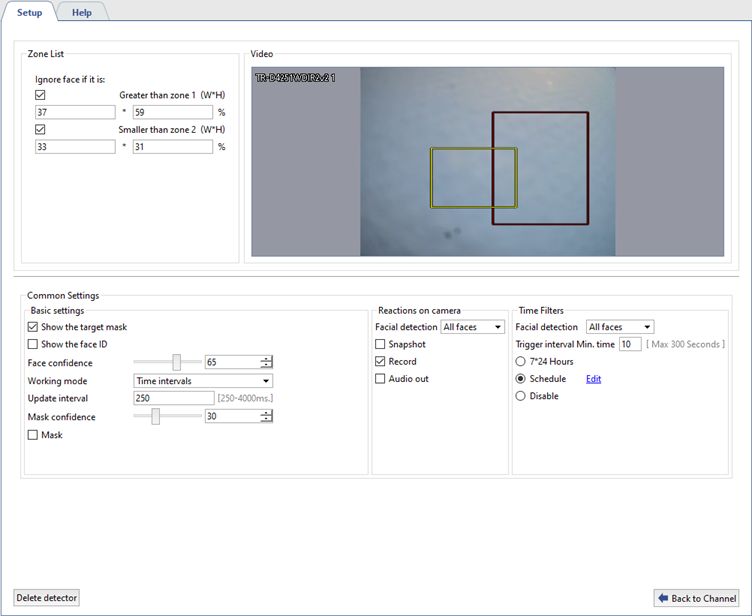
Detector settings window:
-
By default, the face detection zone is the entire frame.
Tip
In the settings of certain camera models, the face detection zone can be changed. To change the zone boundaries, click on the corner of the colored frame and move it. Do the same with other corners.
Set the minimum and/or maximum face size that the detector will detect. To set the maximum size, check Ignore face if it is greater than zone 1 (W*H) in the Zone List and resize the red frame manually or by specifying the height and width of the face as a percentage of the frame size. To set the minimum size, check Ignore face if it is smaller than zone 2 (W*H) and resize the yellow frame. If you want to detect faces of all sizes, uncheck both.
-
Define the Common Settings of the detector:
- Check Show the target mask to frame the detected faces in the video.
- Check Show the face ID to show a unique identifier above each detected face.
- Define the Face confidence in the frame. The lower the value, the higher the probability that the detector will mistakenly identify a photograph or other object as a face. If the detector starts to trigger false alarms, the confidence value should be increased.
- Select the detector working mode. Time intervals: the detector will search for faces during the specified time period. Specified area: the detector will search for faces in the selected area.
- Define Update interval: the period of time, in seconds, after which the detector starts searching for faces in the frame again in the Time intervals operating mode.
- Define Mask Confidence: the confidence threshold that the recognized face is wearing a protective mask. The higher the value, the lower the probability of false positives. If necessary, check Mask to highlight people without masks in the frame.
-
In the Reactions on camera setting, in the Facial detection field, select the type of detected faces for which camera reactions will be triggered: All faces, Wear mask, No mask. For each type, enable camera reactions that will be performed when the detector is triggered:
- Snapshot: create a snapshot of an image at the moment of an event and save it to the camera's local storage or to an NFS server.
- Record: automatic start of video recording from the camera when the detector is triggered. The footage is saved to the local storage of the camera or to the NFS server.
- Audio out: playback of the camera's audio signal through a connected device.
Tip
To perform the selected actions, all necessary parameters must be correctly configured in the camera settings. For details, see the camera user manual.
-
In the Time filters setting, in the Facial detection field, select the type of detected faces for which the filter will be used: All faces, Wear mask, No mask. For each type, define the detector working mode:
- The Trigger interval Min. time parameter defines the minimum time (in seconds) during which a person must be in the zone for the detector to register their presence. The lower the value of the parameter, the higher the sensitivity to short-term entries into the zone. The higher the value, the lower the probability of false alarms during accidental entries into the zone.
-
Select the detector working mode:
7*24 h.: if it is necessary for the detector to work continuously around the clock, 7 days a week.
Schedule: to set up specific intervals for the detector to operate. To do this, click on the Edit link and in the window that opens, highlight in red the time intervals during which the detector should be active.
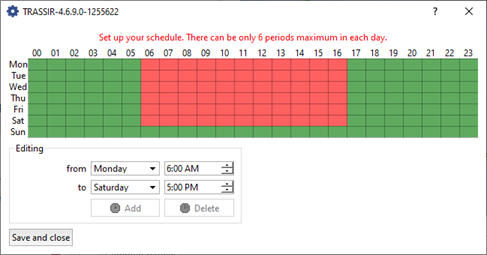
Disable: to turn off the detector.
