The number of access points is determined by the device technical characteristics. You need to configure them for further use.
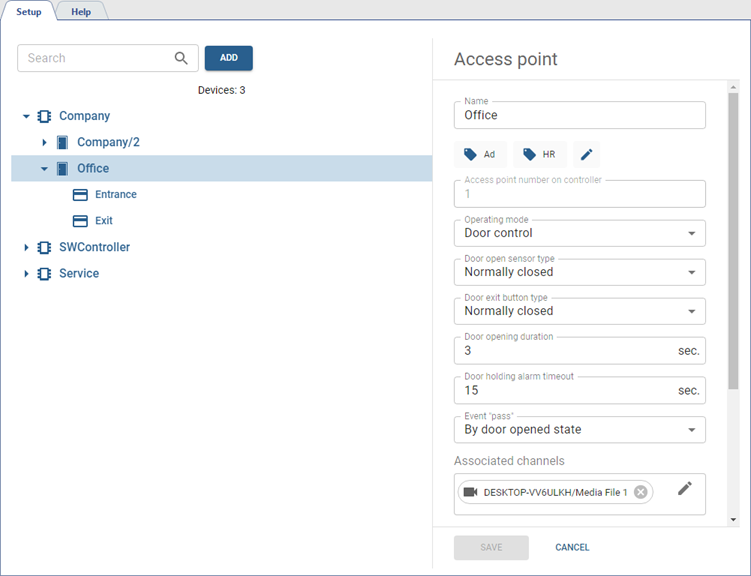
To do this, select the access point and configure the following parameters:
- Name which will be displayed in the object tree.
- Add Tags to make it easier to find the access point among all added devices (see Tags).
-
Select mode, in which the access point will operate in the Work mode field.
The Door control mode is the standard access point operation mode, suitable for all readers.
The Turnstile control mode is a special mode that uses a pulse of less than 1 sec to open the door and replaces the "Door breaking" event with the "Passing" event.
- Select the door sensor state, which occurs when the door is in the closed position, in the Door open sensor type.
- Select the button state the same way in the Door exit button type field.
-
Set the time period within which the door lock will be unlocked in the Door opening duration field. The countdown will start immediately after the button pressing or card reading.
If the value Turnstile control is selected in the Work mode field, the value of the interval must be 1 sec.
- The amount of time in the Door holding alarm timeout defines how long the door can be in the open state. In case upon this time expiration the door remains open, it will trigger the alarm event.
-
In the Event "pass" field, select on which event, generated on access point, TRASSIR ACS will create the Pass event in Access Control log:
By door opened state - upon successful authorization, when the door is opened;
By door open event - after successful authorization, as a result of which the door was opened. This option should be used in case the Turnstile control value is selected in the Work mode field.
- In the Associated Channels field, select video channels to associate them with all events that occur and are logged at this access point. When reviewing events, video from these channels will be displayed in the TRASSIR ACS template or on the active monitor.
-
In the Readers settings block, you can define a list of readers that the access point will use. Check the boxes next to the readers you need.
-
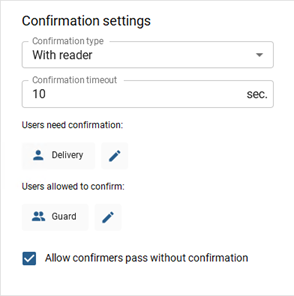
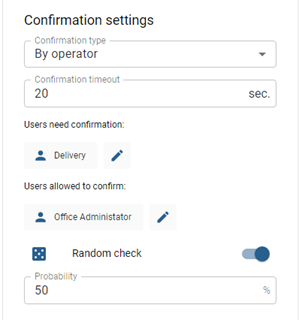
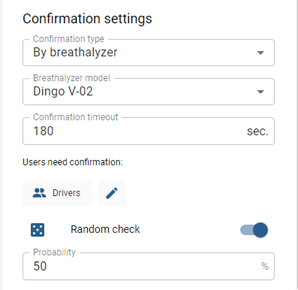
In the Confirmation settings block, you can enable the access point operating mode, in which confirmation will be required for certain persons to pass through.
To do this, select Confirmation type, set Confirmation timeout and specify Users need confirmation ans Users allowed to confirm.
For the Operator and Breathalyzer confirmation types, it is possible to set a random check of persons and specify the probability as a percentage of all persons selected for the confirmation pass.
Tip
In case of confirmation by the Operator, Users allowed to confirm must be linked to the server users (check Creating a new person).
The process of operator pass confirmation is described in Passing with confirmation.
Important
Access confirmation using the Breathalyzer is available with a LICENSE_PACS_ALCO license purchased in addition to the basic TRASSIR ACS license on the server.
Available licenses are listed in the server settings on the tab License.
Important
Features of Passage Confirmation:
- this feature is not supported by all devices (check the instruction manual for the connected device);
- to correctly pass using the Alcoramca, you need to set the threshold to 0.0 mg/l in its settings in the web interface - otherwise the confirmation will not work;
- For the breathalyzer models Dingo B-02 and Alcobarrier-01, you can set up access with confirmation by specifying the threshold in the device settings or software;
- the feature is not supported when the access point is included in the Software gateway (see Rules of passage);
- the simultaneous use of Passage confirmation and Authentication by TRASSIR is not available.
Tip
Using access points, you can configure various rules that will be executed depending on their current state.
See more on setting up autonomous rules in Autonomous rules settings.
