Go to Plugins -> Access Control Enterprise -> Reports.
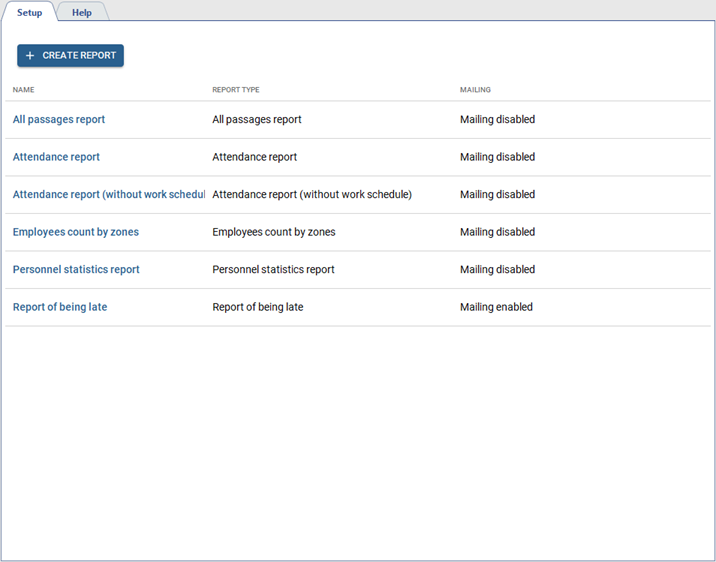
TRASSIR ACS lets you create the following report types:
-
All passages report - a report on all persons passages for a specified period of time.

-
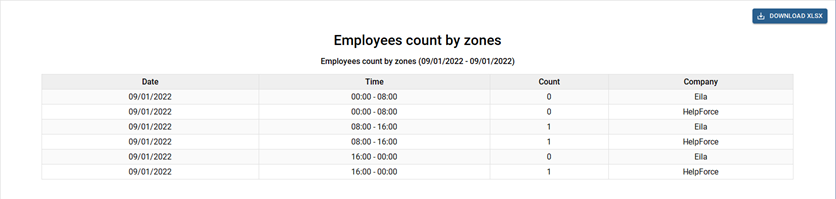
Employees count by zones - report on the location of people in zones, depending on the time of day.
-
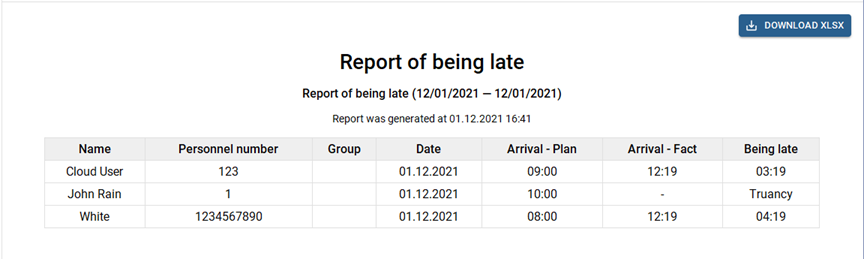
Report of being late - a report on employees arriving later than the arrival time, specified in the work schedule.
-
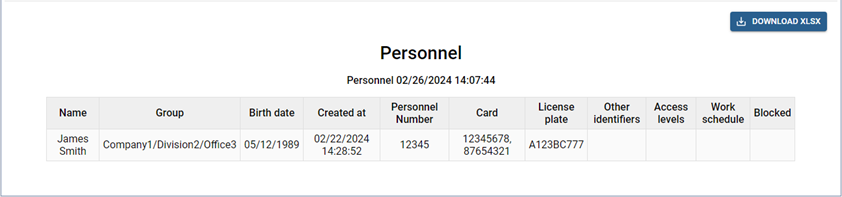
Personnel - a summarized report on all employees.
-
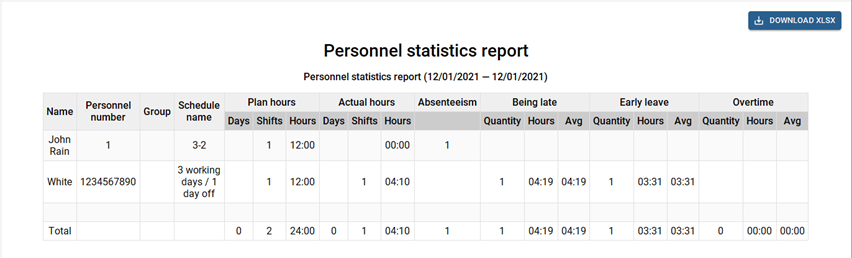
Personnel statistics report - a summary report on the person's time at the workplace.
-
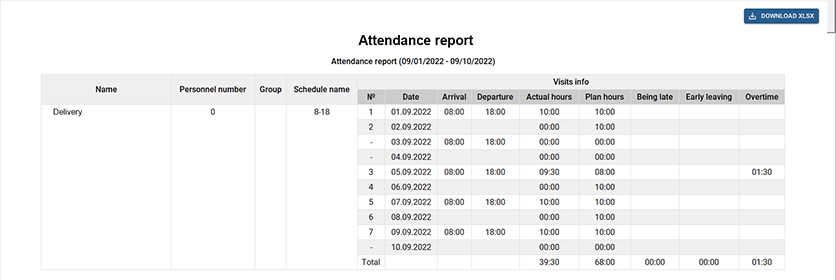
Attendance report - a report of attendance, time of arrival/departure, overtime, as well as on late arrivals and early departures, built on the working schedules of the selected settings of the persons.
-
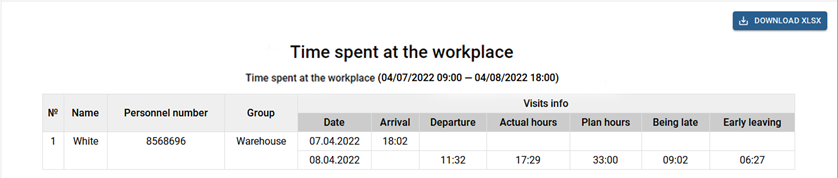
Time spent at the workplace - a report on attendance, time of arrival/departure, as well as the late arrivals and early departures built on a common work schedule selected in the report settings.
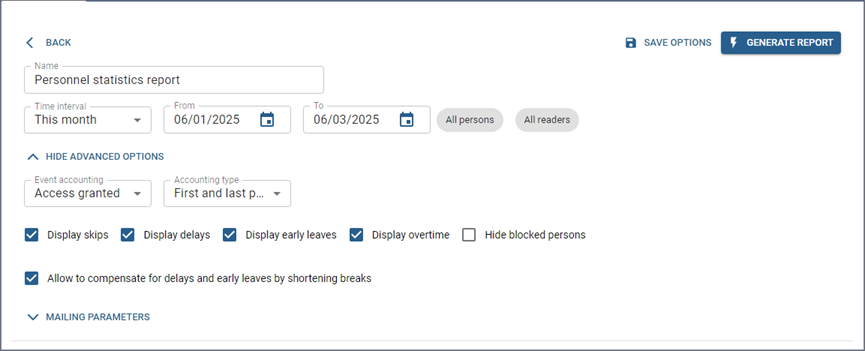
Press Create report and select report type in order to create a new report. Customize all required parameters and press Generate report. You can save all report parameters, if necessary, by pressing Save options.
You should take into account the following filter features when creating reports:
-
You can build any report for the specific areas, readers or persons, if necessary. To do this, press All areas, All access points, All persons, or All companies buttons and select the values that need to be displayed in the report.
-
The Event accounting field lets you select the event type, by which the person's arrival/leaving time will be determined and used for building report.
Access granted is an event when a person is authenticated by any allowed type.
The Pass event appears upon the door opening after the Access granted event.
-
Set the Take employees working schedule into account flag in order to calculate and display data on late arrivals, early leaves and overtime. The corresponding work schedule should be set in the person's settings.
The Display skips, Display delays, Display early leaves, and Display overtime flags will enable the corresponding columns in the report.
Set the Hide blocked persons flag to exclude persons with suspended identifiers and access levels from the report (see Personnel).
Tip
Any absence of the employee during the work day, or being at the workplace outside the work schedule, will be counted according to the Variations settings (see Work schedules).
When building All passages report, you can set the Hide empty lines flag, in order to display only rows with people who have any events in the report.
-
Set the Display timezone flag to display the time zone column, ensuring that the time of events is presented correctly depending on the time zone. This setting will be useful when working with different regions when the devices are configured with different time zones.
-
When building the All passages and Personnel reports, by clicking the All Columns button, you can select specific columns containing key information: name, ID, access level, work schedule, and other parameters (including Person extra fields).
You can also set Hide blocked persons flag to exclude them from the report.
-
When generating the Employees count by zones report, you can check Maximum time spent in the area and specify a time limit. The report will show employees whose time in zones did not exceed the specified limit.
-
When you create an Attendance report or a Personnel statistics report, Allow to compensate for delays and early leaves by shortening breaks is automatically checked. If the employee did not leave for lunch break or did not leave for the entire interval, the unused break time will compensate for the delay or early leave. If the option is not checked, the unused break time will not compensate for early leaves and delays when calculating the time worked.
-
When generating the Attendance report, you can check Hide absent persons so that the report displays only rows with persons who have records for the specified period.
-
The Time spent at the workplace report filter parameters are customized depending on the Show all stay intervals checkbox:
Table 131.
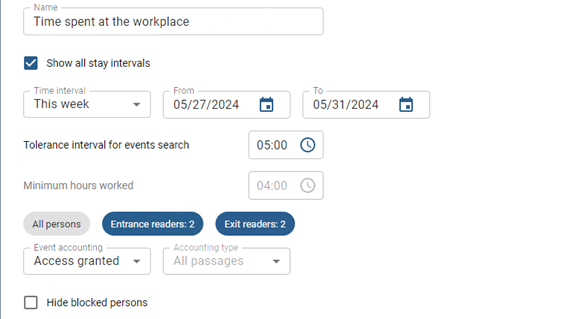
If Show all stay intervals is checked, the report will show all intervals (entries and exits by reader) for the selected Time interval.
You can choose the length of the tolerance intervals, within which the system will search for events (employee entries and exits) regarding the selected Time interval in the Tolerance interval for events search field.
Tip
If only one event (i.e. entry or exit) within the Time interval is found, considering the Tolerance interval for events search, it will be displayed as a blank line in the report.

If Show all stay intervals is unchecked, the report will show all intervals (entries and exits by reader) for the selected Work shift.
Apart from that, the values Plan, Delays and Early Leaves will become available to check or uncheck in Advanced Options to show or hide them in the report.
You can choose the length of the time intervals, within which the system will search for events (employee entries and exits) regarding the selected shift in the Tolerance interval for events search field.
The value set in the Minimum hours worked parameter will allow you to exclude the employees who have worked less than the set minimum time, from the report.
Tip
If only one event (i.e. entry or exit) within the Work shift is found, considering the Tolerance interval for events search, it will be displayed as a blank line in the report.
-
In order to display the direction of the passage (entrance or exit), you should select its location in the reader settings.
Tip
A report with a large amount of data will show only the first 300 lines. Click Download XLSX to download the full report with all the data.
If Export XLSX file horizontally is checked in Advanced Options for Attendance report and Time spent at the workplace report, the dates in the exported report will be listed in a row and information for them in columns.
Important
All server users can view created reports.
Only those users who have the Plugins -> Access Control Enterprise -> Reports -> Settings flag enabled in their rights settings, will have access to create, edit and delete reports.
Read more about user rights settings in the "Administrator's Guide" (Determining access rights).
You can set up automatic sending of reports by e-mail. To do this, set theAutomatically mailing a report flag in the Mailing parameters list.

Tip
The Automatically mailing a report if the Other value is set in the Report period field.
Specify the mailing addresses in the Addresses field. Select the preconfigured email account in the Mail account field (see Adding an email account).
Select the mailing frequency in the Periodicity field:
-
Day - set the start date and also how often in how many days and at what time the report and mailing will be generated.

-
Week - specify the days of the week, when the report will be generated and sent out.

-
Month - specify, separated by commas, on which days of the month the report will be generated and sent out.

