Important
At least one access level should be created for operation with TRASSIR ACS persons.
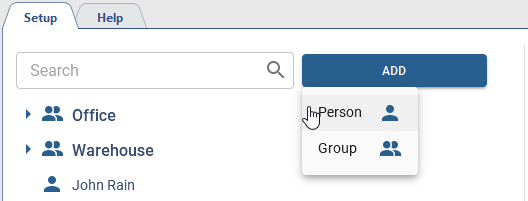
In order to create a new Access Control person, open Plugins->Access Control->Personnel, press Add and select Person.
And follow the steps below:
-
Enter the employee's Name. Specify Gender, Birth date, Group, Personnel number and other person's data, if necessary.

Click
 next to the Group field, to save the current person's location to the clipboard. It can be used when creating a file to import new persons into the same group.
The Department and Job title are the additional person's fields that can be created by pressing
 .
.

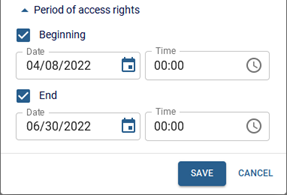
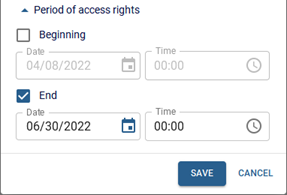
Set the Period of access rights for this person in order to set limit to use identifiers and access levels.

-
Upload an employee's photo by pressing Add photo.
In the window that opens, select one of the ways: Select a file on your PC, Webcam snapshot or Terminal snapshot and add the employee's photo.
When uploading a photo from your PC or creating a photo using webcam, you can use the crop feature to resize the added photo.

Table 113.

In order to use a face for authentication in Face Recognizer, click the Add face to face DB link. If a device that can recognize faces has been added to Access Control, the face photo will be automatically uploaded to the device.
Important
The Face Recognition function is available only if the Face Recognizer plugin is enabled.
The face database will be used for the face recognition.
For more information on the Face Recognizer plugin settings, see TRASSIR Face Recognition.
Press Remove photo to remove all person's photos, including previously uploaded ones.
-
in order to manage an employee's working hours, select Work schedule.
Use various settings to create any work schedule (read more in Work schedules).
-
Add identifiers that will be used by the employees to authenticate in Access Control.
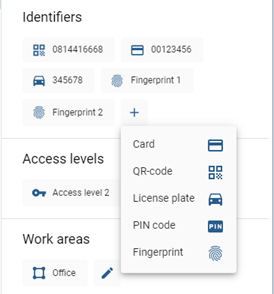
Table 114.

Card - select identity card data input type and enter:
- using USB reader connected to the client/server;
- using the reader installed at the access point;
- by entering the card data into the input field manually.
Set the Use card protection flag, to protect the card data using the active profile configured in section Card protection.
Tip
If UID type is set to Manual input in the profile settings, the Use card protection function is unavailable.
Important
Features of data entry from identification cards:
- Data input from an ID card using a USB reader is only supported in Windows version.
- ZKTeco CR10 and ZKTeco CR20 readers transfer data in keyboard emulation mode. That's why you should use Without reader (manual input) mode in order to enter ID card data using these readers.
- ZKTeco USB readers store data in Wiegand 34 format. If the readers used by personnel for authentication use Wiegand 26 format, set the Convert to Wiegand 26 flag when adding the card.
- HIKVISION DS-K1F180-D8E USB reader supports data protection when using Wiegand 26 and Wiegand 34 formats. For the Wiegand 58 format, data protection is unavailable - the Use card protection flag must be disabled, and the card data must be 7 bytes in size.

QR Code - download an automatically generated QR code that can be used to authenticate with a QR code scanner.

License plate - enter the vehicle license plate number that will be used for AutoTRASSIR plugin authentication.
Important
The License Plate Recognition function is only available if the AutoTRASSIR plugin is enabled.
For more information on the AutoTRASSIR plugin settings, see AutoTRASSIR/AutoPass.
When saving, ACS checks the uniqueness of the vehicle's license plate number. If multiple persons use the same number, enable the Shared license plate number option for all persons using this number to bypass the uniqueness check.
Tip
It is recommended to use the Shared license plate number feature if the reader authentication mode settings have the AND option selected.
If the OR option is selected, the person will be recognized as an Unknown person with the event Access denied.
Tip
When entering the number, you can use letters of Latin alphabet, as well as "mask", in which unknown characters are replaced by "*" or "?".
The "?" symbol is used to indicate only one unknown character, and the "*" symbol - one or more unknown characters. For example, if the license plate number is known, but the region is unknown, you can use the following types of masks:
60633?? - for numbers with two-digit region only: 6063361 or 6063372.
6063??? - for numbers with a three-digit region only: 6063361 or 6063522.
6063* - for numbers with both two- or three-digit regions: 6063361 or 606336.

PIN-code - enter the pin code that will be entered by the employee on the controller panel.

Fingerprint - select the fingerprint scanner and attach your finger to the sensor.
Tip
All identifiers will be used for Access Control authentication, depending on the Authentication mode selected in the reader's settings.
-
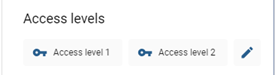
Assign the corresponding Access levels to a person (see section Person access levels).
-
Assign Rules of passage to protected areas to a person (see Rules of passage).

Tip
In order to reset the current location of a person, click
 . The person will be able to authorize again to enter or exit the zone.
-
Select Work areas to track the person within the secured perimeter (see Areas).

In addition, you can use the Neuro Detector plugin to track a person, select its areas in the Detector Areas group.
Important
The function of tracking persons in detector areas is available only with the Neuro Detector plugin and the LICENSE_PACS_VA_ATTENDANCE license purchased in addition to the base TRASSIR ACS license on the server.
One license allows you to set up tracking for 10 people.
The number of detection areas is determined by the number of corresponding licenses and the Neuro Detector settings.
For detailed Neuro Detector configuration, see TRASSIR Neuro Detector.
Available licenses are listed in the server settings on the tab License.
Tip
Selecting the Detector Areas, take into account the following:
- Configure the detector areas for each channel on the Object counting tab (see Neuro Detector settings).
- You can select detector areas from any connected server. If the server is unavailable or the area is deleted, Inaccessible Area will be displayed instead of the area's name.
- You can select multiple areas for one person, and the same areas can be assigned to multiple persons.
-
Enter a local or cloud user account so that user will be allowed to confirm, and use WEB interface and mobile app to work with TRASSIR ACS.

Tip
The access rights to the TRASSIR ACS plugin are set depending on the user type:
- local users - in server settings (check Determining access rights);
- cloud users - in TRASSIR Cloud settings (check User rights management).
-
When using the function Data Synchronization an Active Directory account associated with the person is displayed under the Active Directory user.

Tip
Click Select user and enter the user data to link the person manually to the Active Directory account.

-
Add contact information to receive notifications about TRASSIR ACS events (see Notifications).

-
Add Tags to simplify the person search (see Tags).

Import of persons
In case you need to add a large number of personnel, there is an import function. To activate it, click and select Import persons feature.

Table 115.
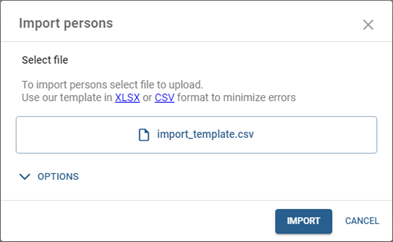 |
Select a file with a list of persons. Use a ready-made template to simplify the process of creating a persons list. When importing persons with extra fields, make sure these fields already exist in Access Control settings. In the case the Block Time parameter is used, which specifies the time period for which the user will be blocked, you should pay attention to:
Make sure you use the proper value format in the columns before import:
|
 |
Configure the necessary import parameters:
Click Import to load the data. |
 |
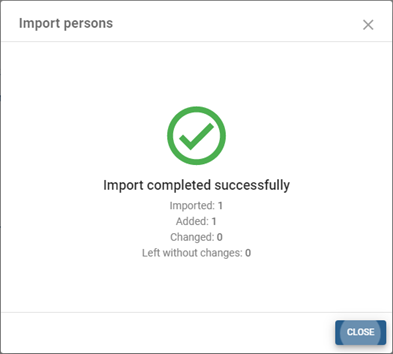 |
All added persons will be displayed after updating the Personnel section.
