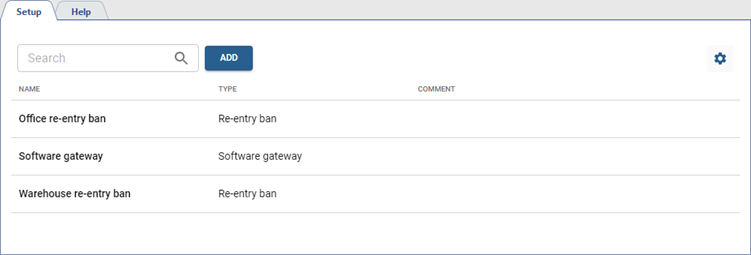
This section is intended for creating rules that will be used to authenticate persons and allow them to enter protected areas.
In TRASSIR ACS, you can create the Rules of passage of the following types:
-
The Re-entry ban is the type of the rule that forbids the re-entry through the reader in the selected area, if the person has already authorized on this reader. For example, if the person has passed through the Entrance reader in a specified zone, he/she can exit only through the Exit reader of the same area. However, the person can freely use other readers that do not belong to this area.
-
Gateway allows to set a rule for consecutive passage through several access points united in a gateway. To create a rule, indicate the device and the list of access points forming a gateway.
-
Software gateway is similar to the standard gateway but allows to create routes to pass any access points irrespective of their binding to certain devices.
Go to Plugins -> Access Control -> Rules of passage.
Re-entry ban
Important
Re-entry ban usage pattern:
- The rule setting is available only on the TRASSIR TR-C481 controller.
- At least one protected area should be created to create a rule of passage. The Entrance readers and Exit readers should be selected in its settings and the Can be used in rules of passage flag should be set.
- One or more Authentication Types should be selected in the reader settings, and/or Authentication by TRASSIR should be enabled.
- In order to store information about the current persons' location and to confirm the passage, the access points with readers in the protected area must be permanently connected to TRASSIR ACS the server. If the server is unavailable, the person will not be able to authorize and pass through the reader.
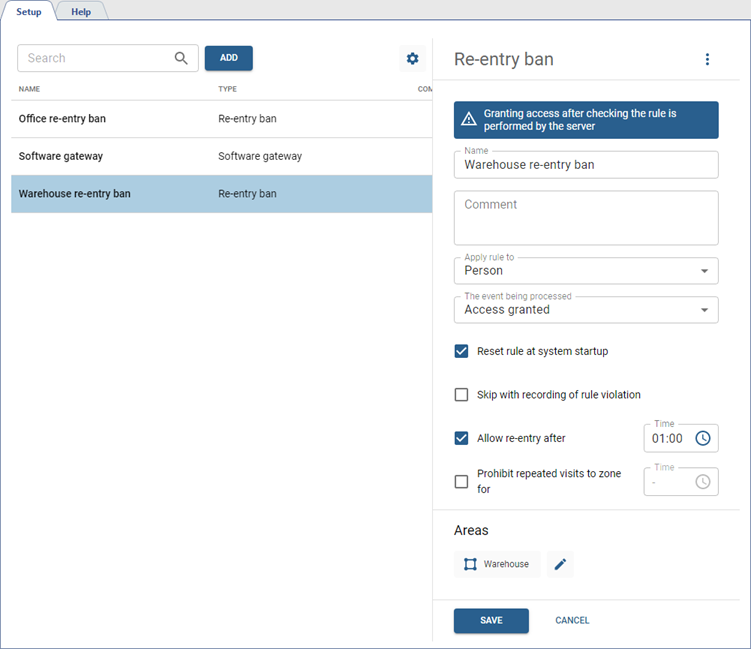
To create a new rule, press Add, choose Re-entry ban and proceed as follows:
-
Enter the Name of the rule and add a Comment, if necessary.
-
In the Apply rule to field, select the option to which this rule will be applied:
-
Person — the rule will be applied to all of the person's identifiers.
-
Identifier — the rule will be applied to each of the person's identifiers separately.
For example, if a person has two cards listed as identifiers, and the Re-entry ban rule is triggered with one of them during authorization, the employee can use the second card for re-authorization.
This condition is ignored if biometric or personal identifiers are used for authorization: face, fingerprint, or PIN code.
-
-
Select The event being processed, which will trigger this rule:
-
Access granted — the rule will be triggered after the person's successful authorization (even if they do not pass through the access point).
-
Pass — the rule will only be triggered after the person passes through the access point.
-
-
If the Reset rule at system startup flag is set, then upon launching TRASSIR ACS the current location of the person will be reset. In this case, the person will be able to re-authorize to enter or leave the protected area.
-
Choose one of the options to enable the person's re-entry:
-
Set the Skip with recording of rule violation flag. Regardless of the rule settings, the passage will be allowed, but if the rule is violated, the system will capture a re-pass event.
-
Set the Allow re-entry after flag and select the time period, after which it will be allowed. This option is valid for the readers in the area and allows passing through them again after a specified period of time. If a person leaves the area through the Exit reader, the counter will be reset, and it will be possible to re-enter it through the Entrance reader.
-
Set the Prohibit repeated visits to zone for flag and select the time period, within which they will be prohibited. This feature is valid for the entire area and prohibits re-entry even if the person has already exited through the Exit reader.
-
-
Add the Areas to which this rule will be implemented.
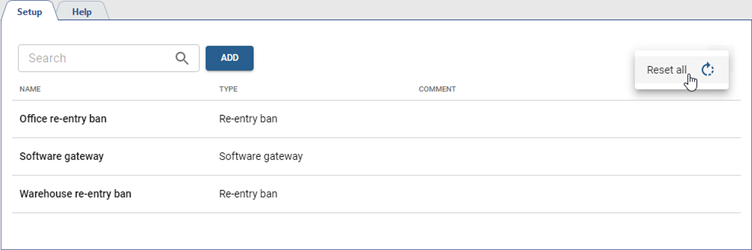
In order to reset the current location of persons using all the pass rules, click  and select Reset all.
Gateway
Important
Gateway rule usage pattern:
- The rule setting is available only on the TRASSIR TR-C481 controller.
- The rules do not require constant connection to the server to operate, since their settings are stored directly on the device.
- You cannot open several doors of the gateway simultaneously. The gateway uses door sensors: when one of the gateway doors is open, the others will remain locked until all doors of the gateway are locked.
- If a door of the gateway is opened by the autonomous rule, it will remain open irrespective of the state of other gateway doors.
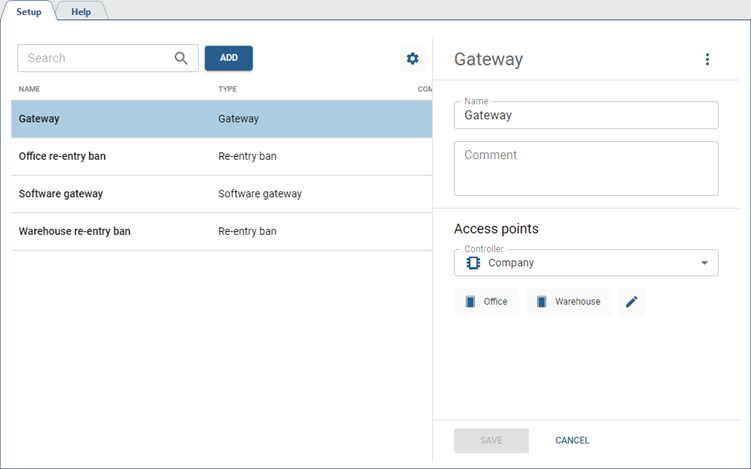
To create a new rule, press Add, choose Gateway and proceed as follows:
-
Enter the Name of the rule and add a Comment, if necessary.
-
Select Controller and Access points to form a gateway.
Software Gateway
Important
Software Gateway rule usage pattern:
- The rule setting is available on several controllers from any manufacturer.
- The rules require constant connection to the server to operate, since their settings are stored directly on the server.
- You cannot open several doors of the gateway simultaneously. The gateway uses door sensors: when one of the gateway doors is open, the others will remain locked until all doors of the gateway are locked.
- If a door of the gateway is opened by the autonomous rule, it will remain open irrespective of the state of other gateway doors.
- Confirmation settings are ignored for the access point in the Software gateway (see Access points settings), and connected card readers ignore the Rules of passage (see Card reader settings).
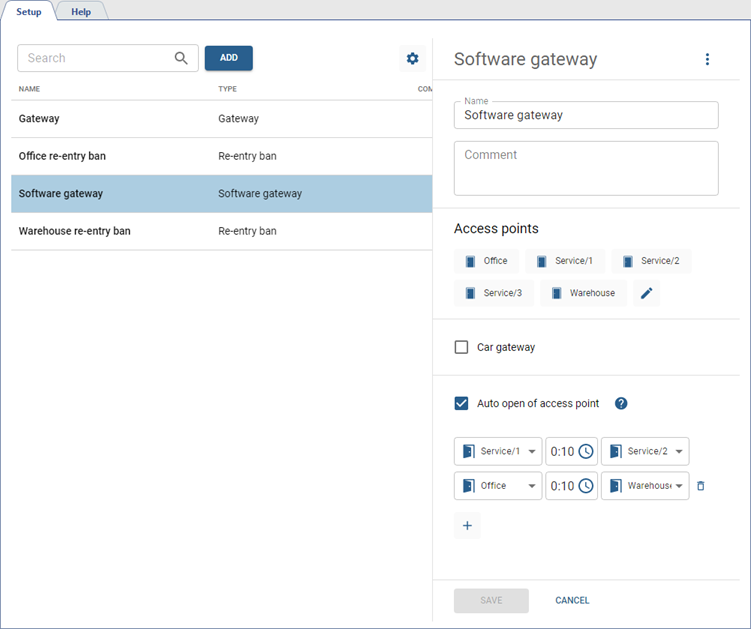
To create a new rule, press Add, choose Software gateway and proceed as follows:
-
Enter the Name of the rule and add a Comment, if necessary.
-
Select Access points to include in the gateway.
Tip
If three or more access points are selected in the Access points parameter, and the door of one of them is open upon the end of the countdown, the access point in the right field will not open its door and Access denied event will occur.
-
If you need one door of the gateway to open automatically after the closure of the other door, check Auto open of access point, select the relevant access points and countdown time to the opening of the second door:
-
Left field: the first access point that triggers countdown to the opening of the other door upon passage.
-
Right field: the second access point that opens its door automatically after the countdown.
-
Middle field: countdown time from the closure of the first door to the opening of the second door.
-
-
If you need a transport passage rule, check Car gateway. Auto open of access point will be checked automatically.
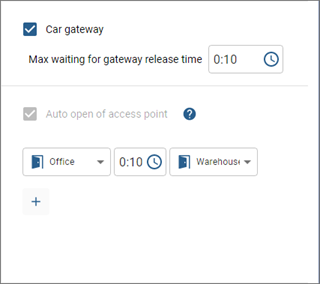
Select Max waiting for gateway release time: the time allocated by the system for a car to wait its passage through an occupied gateway. When the gateway is released, the system checks the waiting car to confirm the same license plate and opens the door automatically. If the license plate changes, the gateway is not released for some reason or the waiting time expires, the door does not open automatically. The waiting time cannot be shorter than the auto open time. We recommend setting the waiting time slightly longer than the auto open time.
Tip
Car gateway usage patterns:
- A car gateway can contain only two access points and one auto open couple.
- A gateway is considered occupied if its entrance door sensor has been opened and closed. The gateway will remain occupied until its exit door sensor is opened and closed.
- If the car arrived, its license plate number was successfully recognized but the barrier or gate was occupied at the time and the car left (or the waiting for the gateway release time has expired), the Access denied event is automatically created in the system. The date and time of this event will be the moment when the car license plate number was recognized.
- The Car gateway works only with license plates or with dual authentication: license plate number + one of the identifiers (card, face, fingerprint). In case of authentication without a license plate number, the waiting for gateway release will not work and re-authentication will be required. Authentication setup is described in detail in section Card reader settings.
